Horizon (26.2) – New Video Timeline view, Batch File Upload via SFTP, Better search filters and more!
Horizon (26.2) – New Video Timeline view, Batch File Upload via SFTP, Better search filters and more!
Release Overview
- New timeline feature in projects created from templates to view different modules within the video which allows the user to easily edit the project.
- Major improvement to automate the batch upload feature by incorporating a SFTP file streaming option to automatically sync files with Individeo and an advanced view of the file processing.
- Incorporated the ability to customize the landing page of shared videos with your own custom branding options.
- Enhanced search filters for projects and templates allowing you to find what you need faster.
- Organize your projects easily with Hide and Delete option for projects.
- Accessibility Updates
Release Details
INDIVIDEO Portal
New Timeline View in Projects
The timeline view is a new way of looking at your project and editing it. It’s a simple approach to create a project from a template (that supports a timeline view) and manipulate it the way you want by using videos from your existing projects.
First create a project from any template that supports the timeline view.
When creating this project you will see the new and improved UI that provides you more flexibility as shown below
You can customize the video using the following options;
- Change the title of the video if needed.
- Select a thumbnail for your project poster, you will have 4 options to choose from
- Upload an image.
- Search for an image from Unsplash.
- Enter a URL for an image.
- Select a frame in the video.
- Add ‘Modules’ – This is where you can select videos from other project that qualify to be merged into the project that is being edited.
- The platform shall provide you with several videos from other projects that qualify.
- The modules you see will be from projects that are in ‘PROD’ status and those projects that you own or that are shared with you.
- Customize the module you have selected from the timeline.
- Select any module in the Video timeline.
- You will be able to see the available customizations for the selected module in the Edit Theme / Personalize tabs.
Adding Modules
Once you click on ‘Add Module’ the platform will present you with some options available from other projects that you own or that are shared with you and has the deployment status ‘PROD’.
Select a module and click ‘Confirm Selection’ for that module to appear on your video timeline as shown below.
Customizing Modules
Now you can customize each module just as before, simply click on the module that you’d want to customize and then the customization options will appear on the right of the video preview.
To make it easier, we have included a dropdown that allows you to either view customizations per module or see all of them at once. Simply click on your preference from the dropdown below.
Once all your configurations are done, click on Save Video. You will have a new media item within your project to advance through the deployment stages and share!
Updates to the Batch Upload Feature
In our last release we introduced the Batch Data file upload feature that allows you to easily upload a file with recipient codes to start sending customized Individeos to your customers.
With our latest release we take this a step further and automated this feature with a SFTP integration for your convenience.
Now you can easily set-up a SFTP file stream with Individeo if you follow the steps below.
Go to the project of your liking and click on the CRM integration tab shown below.
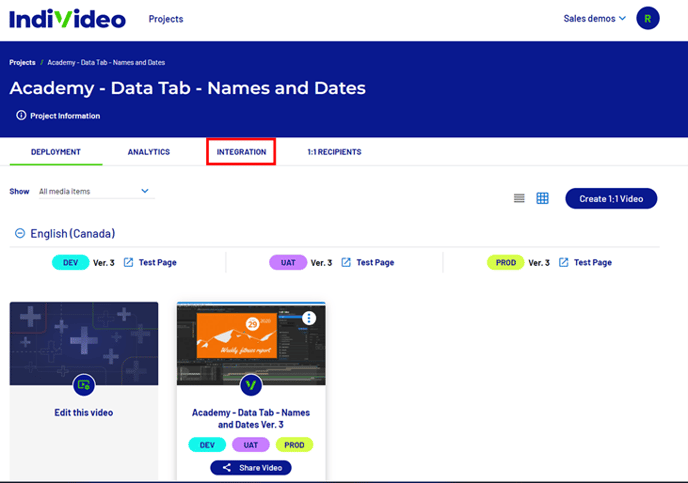
Once within the CRM integration section, click on ‘Data File Upload’ shown below.
Next you will see a new option to either manually upload the file called ‘New File Upload’ or view the upload details of previous files called ‘Update Details’
The Update Details tab will not be in an enabled state if you have not uploaded any file. Once you upload a file, then this tab section will be accessible.
This new section contains all the following new features;
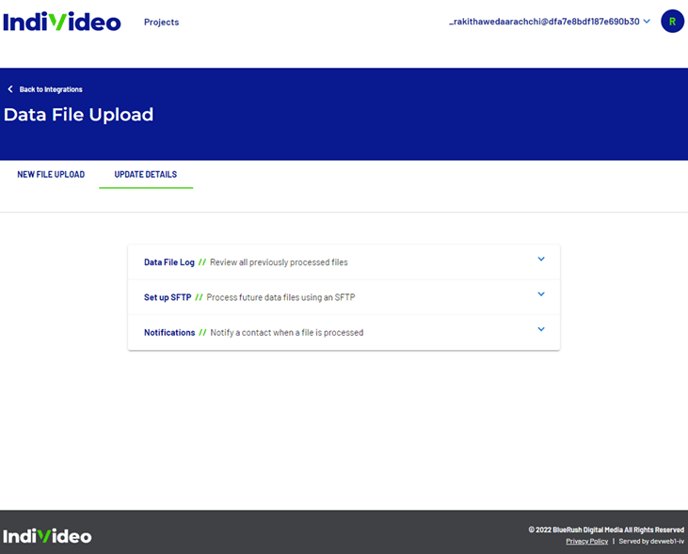
- Data file log – All previously processed files will be shown here with the following information.
- File Name
- Date
- Status
- Row count
- Set-up SFTP – This section is where you can set-up the SFTP file stream. If this is already set-up you will see ‘SFTP Active’ label.
- Notifications – Allows you to enter the email addresses to send notifications when a file has been processed. These contacts do not need an account with Individeo.
Data File Log
Set-up SFTP
Simply enter your public SSH key and we will generate the necessary SFTP address and credentials which you can use in your SFTP client.
Notifications
Get an e-mail notification every time a file has completed processing by entering your e-mail in the form below. You can enter multiple e-mail addresses in a comma separated format.
Customize the Landing Page
We can now customize the following page for you. This is the landing page viewed by your customer when you share a video via a link.
This will allow you to have your own theme and branding within this page making it part and parcel of your platform.
The following areas of the landing page are customizable.
- Header Section
- Footer Section
- CTA Buttons*
- Body
- Social Share Section
*The CTA buttons will be placed below the video frame
Once you customize your landing page with these elements, the final output can be similar to the below page based on your input.
Advanced Search Filters
We have introduced new search filters for the templates and projects section that would easily allow you to track down the item you need.
New Template Filters
The following new filters will be available in the templates homepage. This allows you to easily identify a type of template that best suites your requirement.
When you first visit the template tab you will now see a new ‘Show Filters’ icon as shown below
Once you click on this new button, you will be able to see a variety of new filters that would assist you to better locate the template that best suites your needs.
Hide and Delete Projects
Hide Projects
Easily organize your project homepage by hiding away the projects not frequently used.
Simply click on the 3-dot menu of a project and click ‘Hide Project’
You can only hide and unhide projects if your role within Individeo is Owner of a particular project that you are about to hide or Admin/Master within the company
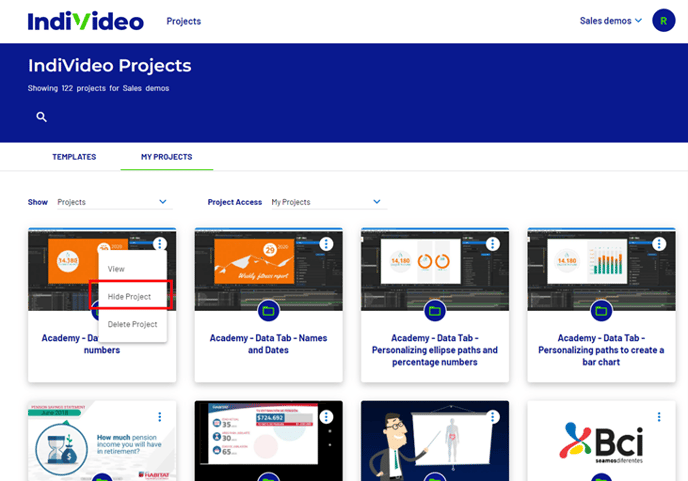
If you want to Hide multiple projects at once, simply hover over the project and click on the Check mark, this allows you to select multiple projects at once as shown below.
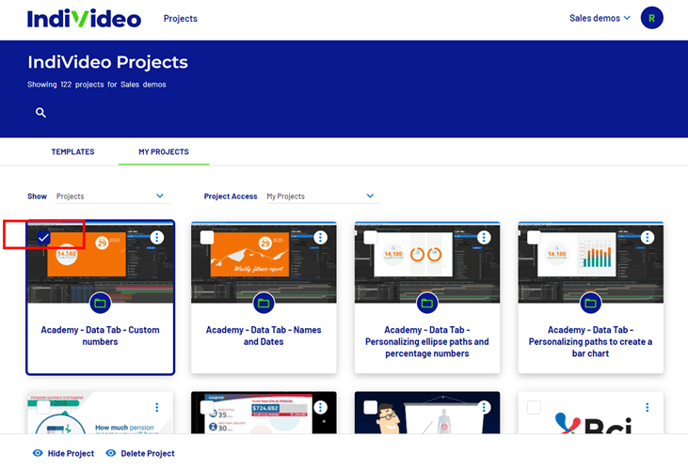
Once you have hidden projects, you can view them again if you select the Show ‘Hidden Projects’ from the dropdown shown below.
Once you are viewing the hidden projects, you can unhide the projects as shown below
1) one by one using the 3-dot menu OR
2) multiple at once by hovering over the projects and selecting the checkbox in the top left corner and clicking unhide Project/s
Hiding a project does not affect the contents or Individeos created using the project in any way. This feature allows you to simply better organize your projects page.
Delete Projects
We have made the process of deleting a project the same and you can follow the same steps as above, but instead of Hide Project selecting the option to ‘Delete Project’ will move the project to the ‘Deleted Projects’ section.
Just like Unhiding a project, the same steps can be followed to restore a deleted project by selecting the Restore Project option once you show ‘Deleted Projects’
You can only delete and restore projects if your role within Individeo is Owner of a particular project that you are about to Delete or Admin/Master within the company
However the only difference between hiding and deleting projects is that once a project has been deleted, any videos already shared with your customers will become disabled and inaccessible.
If you need to ensure your customers are able to access these videos again, you simply have to restore the project.
Project Access Filter
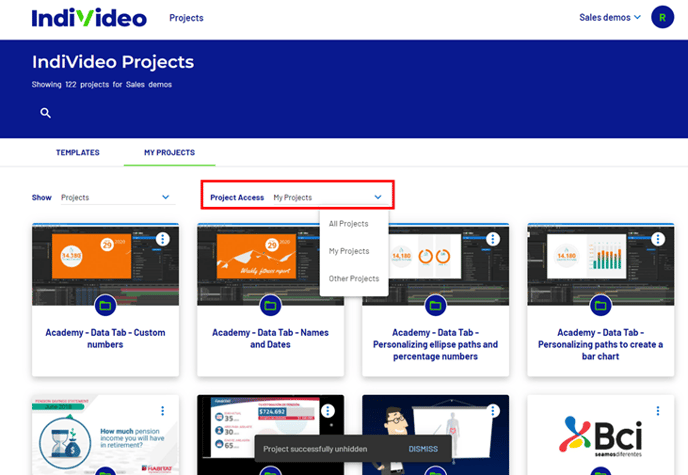
A new project access filter is available in the Projects home page that allows you to filter projects based on ownership to you.
Accessibility Updates
- The video player control will have tooltips for better user guidance.
- Improved support for mobile Screen-Readers on iOS and Android.
- Interactive buttons will come into focus only when they appear in the video to avoid confusion.
- Clients can now control the main player page title for accessibility purposes.
.png?height=120&name=IndiVideo%202024%20Logo%20(2).png)