.png?height=120&name=IndiVideo%202024%20Logo%20(2).png)
One method to personalize your video is by using the build-in feature Data File Upload in the IndiVideo Portal.
Step 1: PreparationStep 2: Where to find the feature
Step 3: Download TSV file sample
Step 4: Incorporate your data in the TSV file
Step 5: Upload TSV and map data
Step 6: Process data file
FAQ
Troubleshooting
This method makes it easy to create between hundreds and thousands of recipient codes, representing a unique and personalized video for each of them.
When uploading your data file, rest assured that your user data is secured on BlueRush maintained servers.
Not sure if this data management method is for you? IndiVideo offers diverse ways to provide data to your personalized video template, some of which allows for data management and hosting on the Portal user’s side.
Let’s carry on with…
Step-by-step
1. Preparation ⬆️
Please review the following list. If you can check off all these preparatory items, then your project is ready for Data File Upload and you can move on to #2.
- Datapoints for integration is done and final (Authoring Mode with the After Effects extension only)
- The chosen GO-LIVE video version is set to PROD approval level.
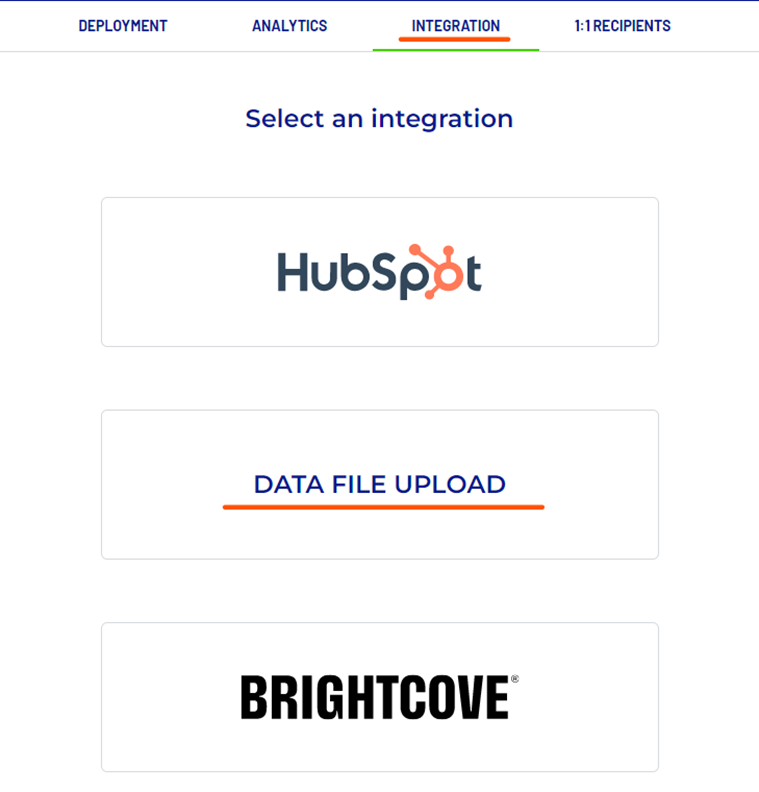
2. Integration tab / Data File Upload ⬆️
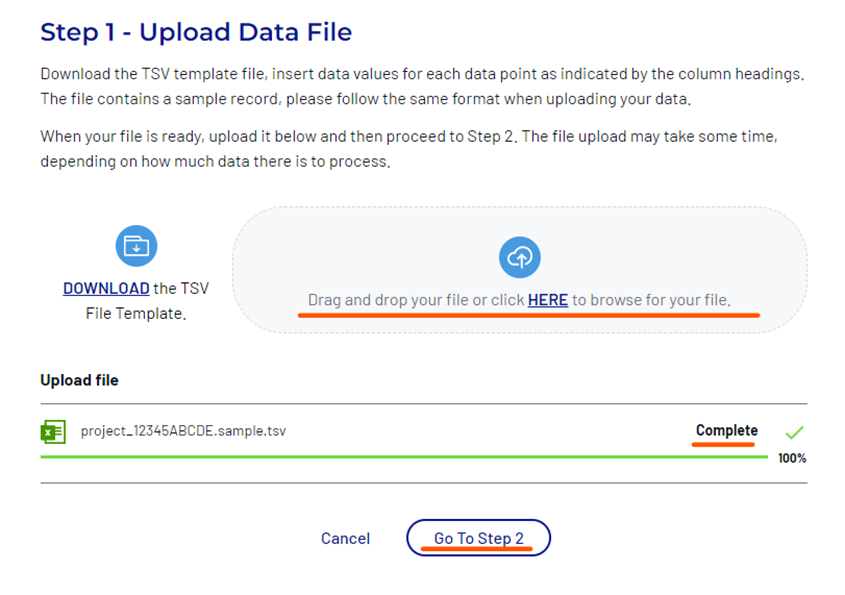
You can upload your data file by going to the Integration tab, then select Data File Upload.
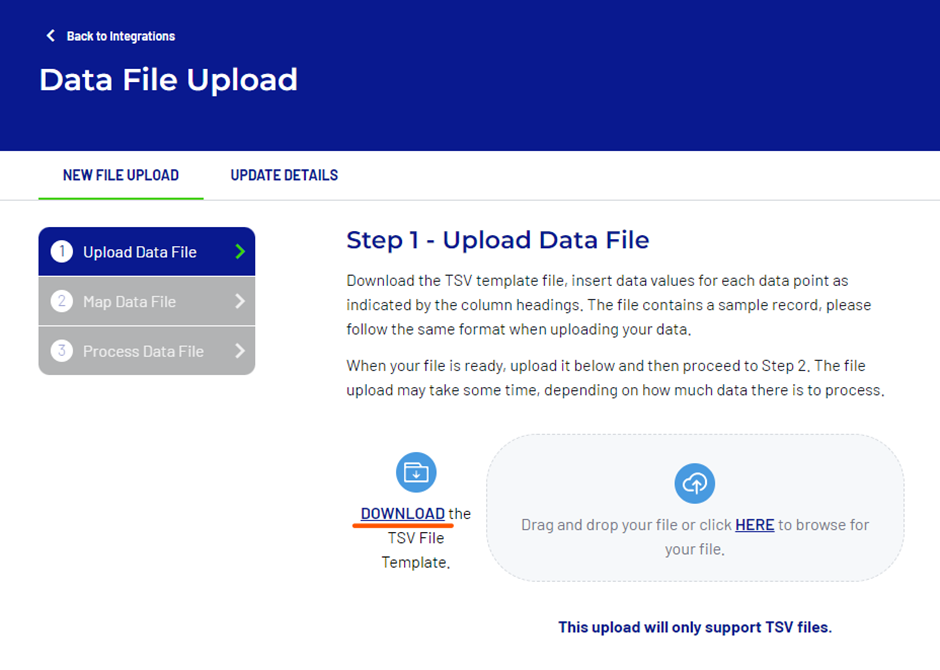
3. Download the TSV file sample ⬆️
Once you get to “New File Upload” tab, step 1 requires you to upload your file.
The file must be a TSV format (Tab-Separated Values files). This file format is supported and can be opened and modified by the popular Microsoft Office Excel, and even Google Sheets.
You may create your own TSV file to upload, but you may find it much simpler to download the TSV file template that the Portal generates for you, with all the known customizable video data entries already included.
The next step will assume that you have downloaded the TSV file template. If you have decided to create your own TSV to import, you may skip the following step.
SFTP data file transfer and automation
Want to automate your data upload using an SFTP setup instead of going through IndiVideo Portal? You can configure your SFTP automatic uploads in Step 3 of the Portal’s Data File Upload process. Just upload the TSV file template as-is and speed-run the rest of the following steps until #6.
4. Update the TSV file to incorporate your data ⬆️
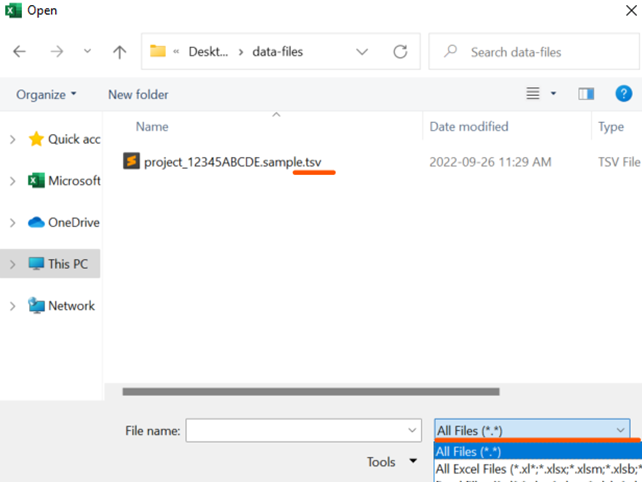
Can't find the TSV from Excel?
When opening the downloaded TSV file with Excel, you might not find it in your Window Explorer right away. Make sure to change the following dropdown from “All Excel Files” to “All Files” and you should be able to see .tsv files.
Inside the file template, there are 2 rows: one header row, and one “entry” row.
The header row shows all the customizable fields by name.
Each “entry” row represents an individual recipient. The default row included in the file template gives an example of the accepted value format for each row:
|
Default file template value |
What it means |
|
ABcDxFh12345678 |
Default sample value for the recipientCode column. Recipient code expects a unique identifier of hexadecimal values. |
|
A string |
Column expects a text value |
|
https://www.example.com/image.jpg |
Column expects an image value. This image may be the URL to an image, or a base64 image. |
|
#1560bd |
Default sample value for a color code. Column expects a colour HEX value. |
|
https://www.example.com |
Column expects a URL value. |
|
true |
Column expects a Boolean value (true/false, 0/1) |
|
1632456000000 |
Column expects a Number value. |
|
12 |
Column expects a Number value, specifically one from 1-12 (months). |
All URL values (image, links, etc.) MUST use a secure protocol (https://) in order to work as expected in your personalized video.
5. Upload the TSV file, then go to Step 2 and map datapoints ⬆️
Upload
Once your recipient entries are ready in the TSV file, save your file and upload it to the Portal Data File Upload, step 1. Then, you’re ready to proceed to step 2.
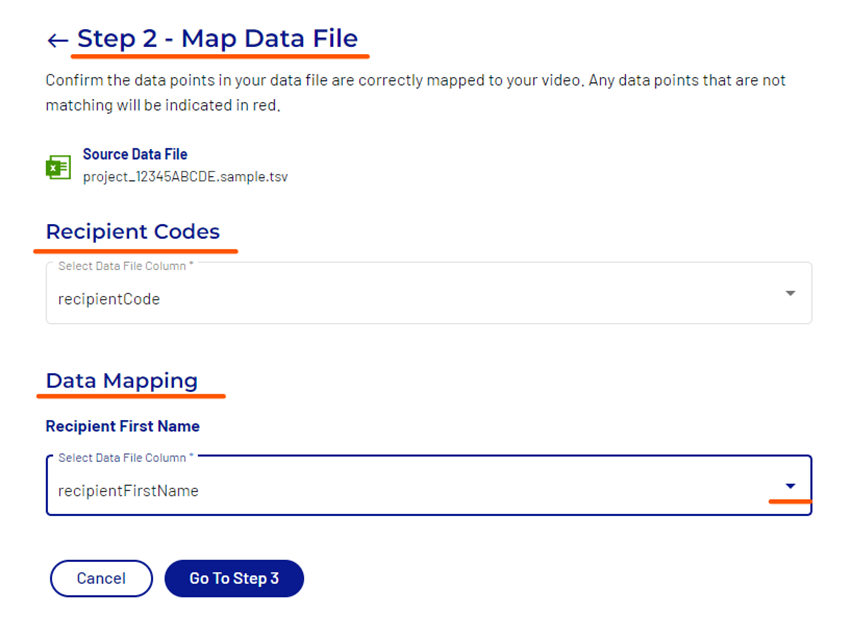
Step 2 - Map Data File
In this step, you can match your uploaded file columns to the customizable datapoints present in your video template.
You will see 2 sub-sections: Recipient Codes and Data Mapping.
The Recipient Codes sub-section only has one column to match in the imported TSV.
Ensure that each recipient code is unique.
The Data Mapping sub-section may have any number of columns to match. For each dropdown, select the option from your TSV file’s header row that matches with each datapoint.
Future Data File Uploads
When reusing the same data mapping in future files, this step will remember previous column mapping.
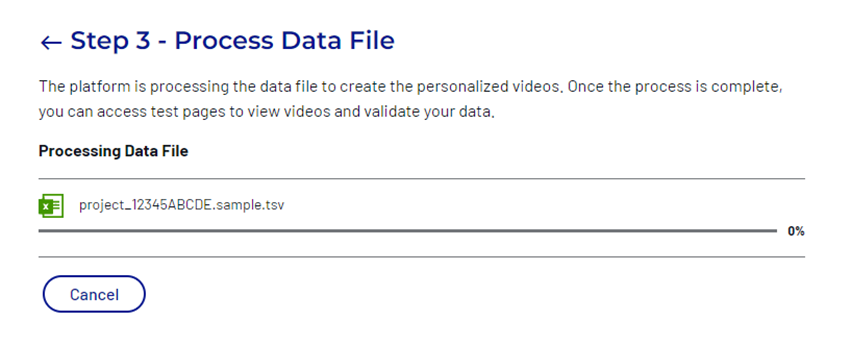
6. Go to Step 3 Process Data File ⬆️
Process Data File portion can take a few minutes, depending on the number of entries. Please remain on the page and logged in for this part to complete successfully.
Once it’s done processing, here’s what the updated view allows you to do:
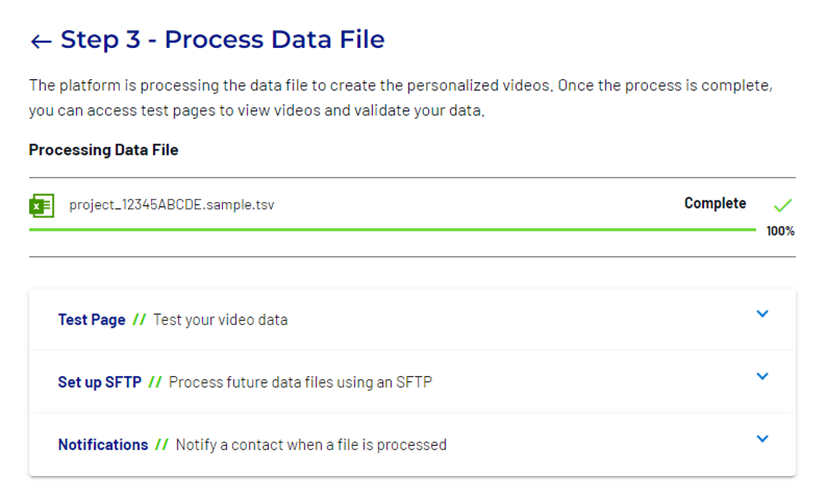
- Test Page: Test your video data
You can preview your uploaded data using the included text field. Just enter the recipient you would like to test and hit “Preview” to open the IndiVideo Portal provided landing page with the personalized video.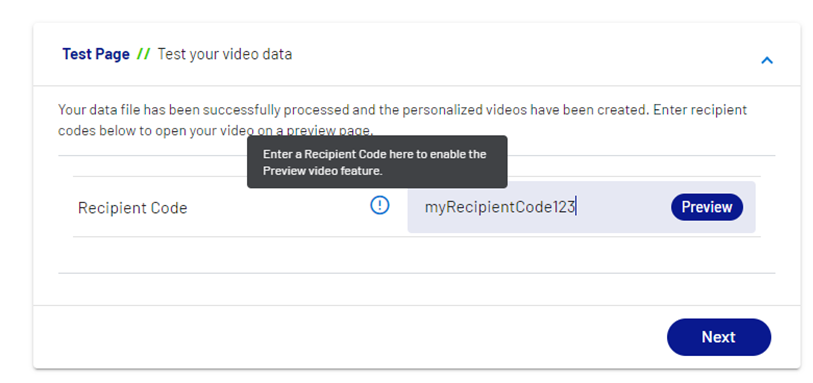
- Set up SFTP Process future data files using an SFTP
Here you can setup up future data uploads to happen automatically through SFTP transfer. Don’t want to go through the Portal for future data uploads? You can set up an automated batch transfer by configuring the SFTP method. - Notifications
Notify a contact when a file is processed.
FAQ ⬆️
What’s the recipient code column?
The recipient code is the unique identifier BlueRush will use to refer to each recipients data sets. It will be part of the PURL for each recipients, so it’s often useful to choose a unique identifier that makes sense from a distribution perspective.
For example, video distribution through Salesforce can easily be done using the Salesforce ID for each client the video is sent to; that’s what you would want to use as a recipient code.
What will happen if I re-upload existing recipients (using the same recipient codes)?
What if you re-upload a data file for an existing recipient? What if you upload a new file and didn’t realize some entries had already been processed in an earlier file?
Answer: your new upload will completely overwrite existing entries.
For example, if you have an existing recipient’s data registered under recipient code ABC123, any following data file upload that has the same ABC123 recipient code inside will locate existing entries in the database, erase the previous entry, then save the new uploaded entry in the same spot. That means if the recipient assigned to the recipient code ABC123 already had access to view their personalized video, any update to the data entry under their recipient code in the database will instantly update their personalized video.
If you want to preserve the data and personalized experience for your recipients from one upload to the next, you must use new recipient codes every time.
How secure is the data transferred?
Hosting is part of the security, but so is video distribution. Because the video is constructed at run-time in a web browser, all data from a specific recipient entry and fetched by the video is visible to your browser. We recommend not to include PII information when using the Data File Upload method. If including this information is unavoidable, please consider using another data injection method.
Troubleshooting ⬆️
Process Data File: Data file upload is stuck and not progressing
If your file has made little to no progress in the Process stage (see #6) and looks stuck for more than a few minutes, the page’s request may have timed out. Please try these potential solutions, starting with #1 and going to the next one in case of failure.
- Re-upload
Refresh and redo the upload process. - Log back into IndiVideo Portal
Log out of IndiVideo Portal, then log back in and redo the upload process. - Segment your TSV file into smaller pieces
Sometimes, the processing of the file times out when it has too many lines to process at once, especially for files with more than 2500 entries*.
* This number may vary depending on the number of columns and amount of data contained in each cells.